Configuring Remote Desktop Gateway on Windows Server.

Remote Desktop Gateway is one of the Remote Desktop Services role services in Windows Server for providing secure access from the Internet to desktop services and RemoteApp-published applications via an HTTPS gateway. A server with the RD Gateway role acts as an intermediary between external clients and internally deployed RDS services. With RDGW, users do not need to set up a VPN to connect to RDS on their corporate network. The standard Remote Desktop Connection client (mstsc.exe) is used to connect. In this article, we will walk through the process of deploying Remote Desktop Gateway on Windows Server 2019 (the instruction is applicable for Windows Server 2022/2016 and 2012 R2).
Installing the RDS-Gateway Role in Windows Server.
The Remote Desktop Gateway service is not a required component of an RDS farm, so it must be installed separately. In most cases, it is recommended to use a separate server to deploy RDGW, or you can combine it with RDWeb.
It is assumed that you already have an Active Directory directory service and an RDS server farm deployed on your network.
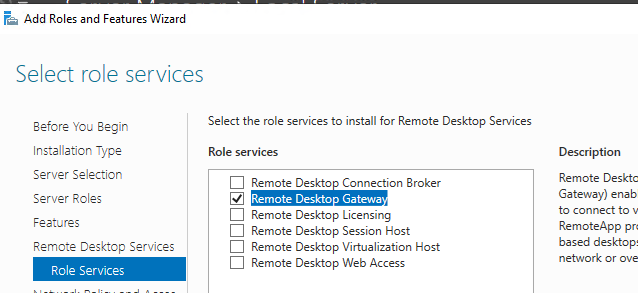
You can install the Remote Desktop Gateway role through Server Manager (Add roles & Features -> Server Role -> Remote Desktop Services) or using PowerShell.
Installing the RDGW service also installs the IIS web server and the NPS (Network Policy Server) role.
Make sure the RDS-Gateway role is installed:
Get-WindowsFeature RDS*
Or install the role on Windows Server using the Install-WindowsFeature command:
Install-WindowsFeature RDS-Gateway -IncludeAllSubFeature –IncludeManagementTools
Create access groups in Active Directory using the ADUC console or using PowerShell :
rdgwExtUsers – a group of users who are allowed to authenticate on the RDGW;
rdgwExternalAdmins – group for access to terminal servers via RDGW;
msk-rds-farm – Should include all RDSH and RD Conneciton Broker hosts that you want to allow to connect to through the Remote Desktop Gateway.
Configuring RDS Gateway Access Policies.
The RD Gateway Manager console (tsgateway.msc) is used to manage policies and access rules on the RDGW. Here you need to configure two types of policies:
- Connection Authorization Policies (RD CAP) - determine who is allowed to log in to the RDS gateway;
- Resource Authorization Policies (RD RAP) - determine who and what resources (computers) of the internal network are allowed to connect through RDGW.
Create an RD CAP policy first:
- Expand Policies -> Connection Authorization Policies and select the menu item Create New Policy -> Wizard;
- Specify the policy name (rdgwExtUsers);
- Select the type of authentication (by password and/or by smart card), specify the group of users who are allowed to authenticate on the RDGW;
- In the Enable or Disable Device Redirection window, you can specify which devices are allowed to pass into the RDP session (clipboard, printers, local drives, etc.);
- Next, you can configure timeouts for RDP sessions;
- Confirm the creation of the policy.
You can also create an RDGW Client Access Policy using PowerShell:
Import-Module -Name RemoteDesktopServices
New-Item -Path 'RDS:\GatewayServer\CAP' -Name 'rdgwAllowAutht-CAP' -UserGroups rdgwExtUsers -AuthMethod '1'
Then create an RD RAP policy:
- In the RD Gateway Manager console, select Policies -> Resource Authorization Policies and select the menu item Create New Policy -> Wizard;
- Specify the policy name: rdgwExternalAdmins;
- Specify the name of the group that is allowed to connect to internal RDS resources;
- On the Network Resources tab, you need to specify which RDS servers your external users are allowed to connect to (msk-rds-farm);
- Next, specify the ports allowed for connection. By default, it is recommended to open only the standard RDP port 3389. But you can open additional ports as well;
- The policy is ready.
You can also create a RAP rule using PowerShell:
New-Item -Path RDS:\GatewayServer\RAP -Name allowextAdminMskRDS -UserGroups rdgwExternalAdmins@site.io -ComputerGroupType 1 -ComputerGroup msk-rds-farm@site.io
Setting up an SSL certificate for Remote Desktop Gateway.
To secure the connection to the RDS gateway, you need to install a certificate on it. It is best to use a commercial certificate issued by an external CA. It is possible to use the free SSL certificate Let's Encrypt (installing Let's Encrypt certificate on IIS for Remote Desktop Gateway). You can also use a self-signed Windows SSL certificate, but keep in mind here that external clients must be sure to trust such a certificate. If the client does not trust the certificate on the RDGW server, it will not be able to connect to the gateway (self-signed SSL certificates can be imported to clients manually or via GPO).
The Subject Name (CN) or Subject Alternative Name field of the certificate must contain the DNS name of the RDGW server that will be used for connection by external clients (accessible from the Internet).
- Open the properties of the RDGW server in the RD Gateway console and go to the SSL Certificate tab;
- In this example, we are using a self-signed certificate. Select Create a self-signed certificate -> Create and Import Certificate;
- Specify the name of the certificate (this DNS will be used by your clients to connect to the RDGW) and the directory where you want to save the certificate (this certificate needs to be distributed to clients);
Windows Server 2019 uses the following ports to connect to RDGateway:
- HTTP Port (default) 443/TCP
- UDPPort (default) - 3391/UDP (using the UDP transport protocol is not necessary, but its support can significantly improve tunnel performance and image quality in an RDP session)
Don't forget to open (forward) these ports to your RDGW host on the network equipment.
Open the RDGW Manager console and make sure that there are no errors in it and all the items are green.
Configuring an RDP client to connect to the RD Gateway.
You can now configure the Remote Desktop Connection client to connect to your internal RDS hosts through the Remote Desktop Gateway.
If you are using a self-signed certificate on the RDGW, you must place it in Trusted Root Certification Authorities on the client.
- Start the client mstsc.exe ;
- On the General tab, specify the name of the RDSH host, RDS farm, or computer to which you want to connect via RDP (you can also specify a username and use the saved credentials for RDP connection);
- Then go to the Advanced tab and click the Settings button under Connect from anywhere (Configure settings to connect through Remote Desktop Gateway when I am working remotely);
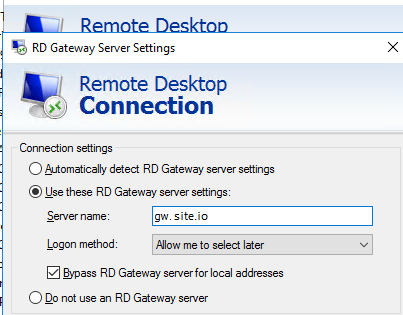
- Select the option Use these RD Gateway server settings , specify the external DNS name by which your RDGW server is available (remember that this name must be indicated in the certificate). If you use a non-standard port for RDGW, you must specify it after the server name separated by a colon, for example: gw.site.io:4443;
- To prevent the client from asking for a password twice when connecting, enable the Use my RD Gateway credentials for the remote computer option;
- Click the Connect button and enter the password to connect to the RDGW server in the RD Gateway Server Credentials window;
- The client must establish a connection with an RDS/RDP host on your local network;
- Launch the RD Gateway Manager console, navigate to the Monitoring section and check that your client connection is listed in the list.
If you are using the RDCMan utility for RDP connections, the RD Gateway settings can be set on the GatewaySetting tab. Enable the Use a TS Gateway server option and specify connection parameters.
You can monitor successful and unsuccessful user connections through RDGW using the Applications and Services Logs -> Microsoft -> Microsoft-Windows-TerminalServices-Gateway -> Operational event log.
When analyzing RDP connection logs to servers, these logs allow you to understand who, when and where connected.
If the user successfully connects via RDGW, an event with Event ID 205 from the TerminalServices-Gateway source will appear in the log
The user "site\my", on client computer "xx.xx.xx.xx", successfully connected to the remote server "msk-rdsman.site.io" using UDP proxy. The authentication method used was: "Cookie".
If you want to run RemoteApp through RD Gateway, you need to add the following lines to the remoteapp *.rdp file:
gatewayhostname:s:gw.site.io
gatewayusagemethod:i:1
In this article, we showed you how to configure the Remote Desktop Gateway role on Windows Server to provide secure remote access to your network using RDP over HTTPS.


Комментарии