Managing KVM virtual machines from the console.

In the previous article, we covered installing the KVM hypervisor and creating a virtual machine. Within the framework of one article, we could not cover all the nuances of managing virtual machines, but only touched on a part of them. Today, we will try to tell you everything about managing virtual machines from the server console: how to change VM settings, add additional devices, and look at the main commands that are used to administer KVM virtual machines.
Virsh: KVM virtual machine management commands.
The first question that arises for a novice KVM administrator is how to see the created virtual machines, how to stop, start and delete them. To manage a VM in KVM from the console, you can use the virsh utility (uses the libvirt API). With the help of the virsh utility, you can perform almost all operations with KVM virtual machines.
# virsh list – show a list of running VMsAs you can see from the screenshot, in the first case, the disabled VM was not displayed.
# virsh list --all – show a list of all machines (including disabled ones)
# virsh shutdown <vm name> - turn off the virtual machine
# virsh start <vm name> - start virtual machine
# virsh suspend <vm name> - pause the virtual machineA few more commands to get various information about the virtual machine:
# virsh resume <vm name> - start a suspended virtual machine
# virsh reboot <vm name> - restart the virtual machine
# virsh destroy <vm name> - destroy the virtual machine
# virsh undefine <vm name> - remove the machine from the list and delete all files belonging to it (usually applied after executing the virsh destroy command).
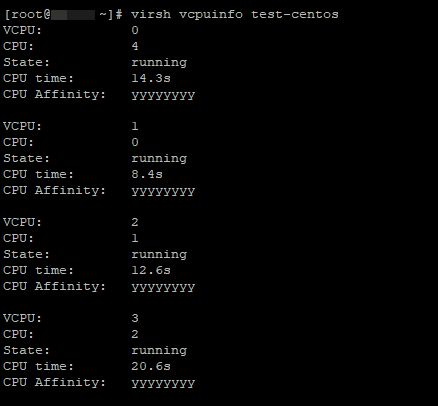
# virsh vcpuinfo <vm name> - information about the processor on the virtual machine.
# virsh domid <vm name> - get virtual machine ID
# virsh domuuid <vm name> - get the UUID of the virtual machine
# virsh dominfo <vm name> - get information about the virtual machine
# virsh domstate <vm name> - view the status of the virtual machine
# virsh dumpxml <vm name> — output the configuration file of the specified virtual machine in XML format
Adding memory and vCPU to the KVM virtual machine.
In the KVM console, you can add or decrease the CPU and memory allocated to the VM in two ways:
With virshIf the virtual machine is running, it must be stopped:
Through the configuration XML file of the VM
# virsh shutdown test-centos
Domain test-centos is being shutdownNow with the help of virsh we will change the number of virtual processors to 6 (vCPU):
# virsh setvcpus <vm name> <vcpu_count> --config
Where:
<vm name>
- machine name
<vcpu_count>
- number of processor cores
For example:
# virsh setvcpus test-centos 6 --configBut when using this command, I immediately got an error:
“error: invalid argument: requested vcpus is greater than max allowable vcpus for the persistent domain: 6 > 4”We cannot set the number of processor cores to be more than the maximum number. To increase the maximum number of VM cores, run the command:
# virsh setvcpus test-centos 6 --config --maximum
Repeat the first command and start the virtual machine:
Let's check the number of processors in the VM settings: the number of processors shown:# virsh dumpxml test-centos
<domain type='kvm'>Let's add memory to the virtual machine in the same way:
<name>test-centos</name>
<uuid>5c7eabea-a180-4f74-af9f-c4c2d3b7f70f</uuid>
<memory unit='KiB'>2097152</memory>
<currentMemory unit='KiB'>2097152</currentMemory>
<vcpu placement='static'>6</vcpu>
# virsh setmem <vm_name> <memsize> --configFor example:
# virsh setmem test-centos 4G --configAll for the same reason, immediately got an error:
“error: invalid argument: cannot set memory higher than max memory.”Increase the maximum memory value:
# virsh setmaxmem test-centos 6G --config
Now you can increase the memory of the VM.
Before all changes, do not forget to stop the VM, and then start it.
You can also change the resources of a KVM VM through its XML configuration file. You can modify the file online or make a backup of the VM XML file, modify it and apply it to the virtual machine.
Let's edit the VM XML file online:
# virsh edit <vm_name>In the vi editor that opens , make changes by clicking the “Insert” button.
Change the block:
<domain type='kvm'>
<name>test-centos</name>
<uuid>5c7eabea-a180-4f74-af9f-c4c2d3b7f70f</uuid>
<memory unit='KiB'>6291456</memory>
<currentMemory unit='KiB'>4194304</currentMemory>
<vcpu placement='static'>6</vcpu>
<os>
For example, let's set the VM to have 2 cores and 1GB of memory:
Consider that the memory is specified in kilobytes.
Save the changes to the file and restart the VM:
# virsh reboot <vm_name>Check VM settings:
The same can be done by making a backup of the XML file:
# virsh dumpxml <vm_name> > /root/test.xmlChange the settings you need, save the file and apply to the virtual machine:
# vi /root/test.xml
# virsh shutdown test-centos
Domain test-centos is being shutdown
# virsh define /root/test.xml
Domain test-centos defined from /root/test.xml
# virsh start test-centos
Domain test-centos startedSometimes when changing the VM configuration file online, the assigned resources are reset after a reboot. In this case, stop the virtual machine and then just start it.
KVM: Adding a Disk to a Virtual Machine.
In one of our articles, we described the process of expanding and shrinking virtual machine disks in KVM. But we did not describe the option of adding an additional disk.
# qemu-img create -f qcow2 -o size=20G /vz/disk/test.imgInstead of qcow2, you can specify the desired disk format, you also need to specify the path to the file. My disk storage is /vz/disk/.
After that, you can add a virtual disk device to the VM itself:
# virsh attach-disk <vm_name> /vz/disk/test.img vdb --type disk --persistentStop and start the VM, check what happened:
# virsh shutdown test-centos
First you need to create an additional disk file for the virtual machine:
Domain test-centos is being shutdown
# virsh start test-centos
Domain test-centos started
# virsh dumpxml test-centos
<domain type='kvm' id='14'>As you can see, the disk has been added. After these manipulations, on the virtual machine you need to partition this disk according to your needs.
<name>test-centos</name>
<uuid>5c7eabea-a180-4f74-af9f-c4c2d3b7f70f</uuid>
<memory unit='KiB'>2097152</memory>
<currentMemory unit='KiB'>2097152</currentMemory>
<vcpu placement='static'>6</vcpu>
<resource>
<partition>/machine</partition>
</resource>
<os>
<type arch='x86_64' machine='pc-i440fx-rhel7.0.0'>hvm</type>
<boot dev='cdrom'/>
<boot dev='hd'/>
<bootmenu enable='yes'/>
</os>
~~~~~~~~~~~~~~~~~~~~~~~~~~~~~~~~~~~~~~~~~~~~~~~~~~~~
<disk type='file' device='disk'>
<driver name='qemu' type='qcow2'/>
<source file='/vz/disk/test.img'/>
<backingStore/>
<target dev='vdb' bus='virtio'/>
<alias name='virtio-disk1'/>
<address type='pci' domain='0x0000' bus='0x00' slot='0x09' function='0x0'/>
</disk>
KVM: Adding a Network Card for a Virtual Machine.
Let's try to add an additional network interface for the VM. First, let's check which network interfaces are created on the host:
# brctl show
I have one virtual machine created on the KVM server, with one network interface. We need to attach one more virtual network interface to br0. Run the commands:
# virsh shutdown test-centosCheck that the VM has an additional network interface:
# virsh attach-interface test-centos --type bridge --source br0 --persistent
# virsh start test-centos
<interface type='bridge'>You can also change the network settings of the virtual machine directly via the XML file:
<mac address='52:54:00:7e:c1:9f'/>
<source bridge='br0'/>
<model type='virtio'/>
<address type='pci' domain='0x0000' bus='0x00' slot='0x03' function='0x0'/>
</interface>
<interface type='bridge'>
<mac address='52:54:00:2f:23:79'/>
<source bridge='br0'/>
<model type='rtl8139'/>
<address type='pci' domain='0x0000' bus='0x00' slot='0x0a' function='0x0'/>
</interface>
# virsh edit test-centos
After the first network interface, add the following lines:
<interface type='bridge'>
<source bridge='br0'/>
</interface>
Save the file and start the VM. The rest of the configuration, KVM will add itself (mac address, etc.).
In this article, we have touched on the main points that you may need when managing KVM virtual machines from the Linux server console.


Комментарии