Manage Microsoft Teams with PowerShell.

The Microsoft Teams PowerShell module is designed to manage Teams from the command line. Module cmdlets can be used to perform common administrative tasks more quickly and in automation scenarios. In this article, we'll show you how to install the Teams PowerShell module and look at typical commands that a Microsoft 365 administrator might need to manage Teams.
Installing the Microsoft Teams PowerShell Module.
To install the Microsoft Teams module, the version of PowerShell on your computer must be at least 5.1. You can display the current version using the command:
$PSVersionTable.PSVersion
Update your PowerShell version if needed.
You can install the MS Teams module from the PowerShell Gallery with the command:
Install-Module -Name MicrosoftTeams
To check that the Teams module is installed on your computer and display its version, run:
Get-Module MicrosoftTeams –ListAvailable
You can download and install the PowerShell module manually.You can install a specific module version from PSGallery. List available module versions:
Find-Module MicrosoftTeams -AllVersions
To install a specific version, use the command:
Install-Module -Name MicrosoftTeams -RequiredVersion 3.0.0
To update the version of the Teams module, run:
Update-Module -Name MicrosoftTeams
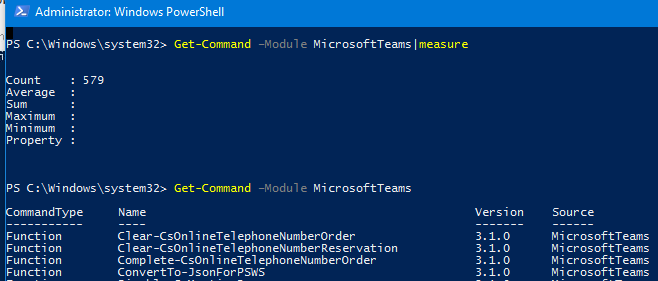
The full list of cmdlets in a module can be displayed like this:
Get-Command –Module MicrosoftTeams
There are 579 Teams cmdlets and functions available in version 3.1.0 of the module.
Using the PowerShell module to manage Microsoft Teams.
To connect to a Teams tenant in Microsoft 365, run the command (if the account is enabled:
Connect-MicrosoftTeams
Enter the username and password to connect. If the user's Azure account has MFA enabled, you need to confirm authentication.
To use the Teams module, your account must be assigned one of the following Azure roles:
- Global Admin
- Teams Service Admin
- Teams Communications Admin
- Teams Communications Support Engineer
- Teams Communications Support Specialist
List all Teams in your tenant:
Get-Teams
To create a new private team in Teams, run:
New-Team –DisplayName SysOps
When you create a new team, a Microsoft 365 group is automatically created with workspaces in Yammer, PowerBI, SharePoint, and an Exchange Online distribution group.
Display all Teams group settings:
get-team -DisplayName sysops|fl
GroupId: 52259fec-0a72-xxxx-96e2-8583xxxxxx
InternalId: xxxxx@thread.tacv2
DisplayName: Sysops
Description: SysOps Wiki Team
Visibility: Public
MailNickName: msteams_cxx92d
classification:
Archived: False
AllowGif: True
GiphyContentRating: moderate
AllowStickersAndMemes: True
AllowCustomMemes: True
AllowGuestCreateUpdateChannels: False
AllowGuestDeleteChannels: False
AllowCreateUpdateChannels: True
AllowCreatePrivateChannels: True
AllowDeleteChannels: True
AllowAddRemoveApps: True
AllowCreateUpdateRemoveTabs: True
AllowCreateUpdateRemoveConnectors: True
AllowUserEditMessages: True
AllowUserDeleteMessages: True
AllowOwnerDeleteMessages: True
AllowTeamMentions: True
AllowChannelMentions: True
ShowInTeamsSearchAndSuggestions: True
You can change the group description and visibility:
get-team -DisplayName sysops| Set-Team -Description "SysOps Wiki Team" -Visibility "Public"
Change group picture:
get-team -DisplayName sysops | Set-TeamPicture -ImagePath c:\Image\NewTeamPicture.png
Add user to group:
get-team -DisplayName sysops| Add-TeamUser -User Kbuldogov@site.onmicrosoft.com
Add group owner:
get-team -DisplayName sysops| Add-TeamUser -User Kbuldogov@site.onmicrosoft.com -Role OwnerAdd user to all commands:
$AllTeams = Get-TeamList users and owners of a Teams group:
$UserToAdd = "Kbuldogov@site.onmicrosoft.com"
ForEach ($Team in $AllTeams)
{
Write-Host "Adding to $($Team.DisplayName)”
Add-TeamUser -GroupId $Team.GroupID -User $UserToAdd -Role Member
}
get-team -DisplayName sysops|Get-TeamUse
List members of all Teams groups and owners:
$AllTeams = (Get-Team).GroupID
TeamList = @()
Foreach ($CurTeam in $AllTeams)
{ $TeamGUID = $CurTeam.ToString()
$TeamName = (Get-Team | ?{$_.GroupID -eq $CurTeam}).DisplayName
$TeamOwner = (Get-TeamUser -GroupId $CurTeam | ?{$_.Role -eq 'Owner'}).Name
$TeamMember = (Get-TeamUser -GroupId $CurTeam | ?{$_.Role -eq 'Member'}).Name
$TeamList = $TeamList + [PSCustomObject]@{TeamName = $TeamName; TeamObjectID = $TeamGUID; TeamOwners = $TeamOwner -join ', '; TeamMembers = $TeamMember -join ', '}
}
$TeamList |fl
Remove a user from Teams group owners and from a team:
get-team -DisplayName sysops| Remove-TeamUser -User Kbuldogov@site.onmicrosoft.com -Role Owner
get-team -DisplayName sysops| Remove-TeamUser -User Kbuldogov@site.onmicrosoft.com
To create a new private channel in an existing Teams group, run:
get-team -DisplayName sysops| New-TeamChannel -DisplayName “Windows_Wiki” -MembershipType Private
Let's add a user to the channel and assign it as the owner:
get-team -DisplayName sysops| Add-TeamChannelUser -DisplayName “Windows_Wiki” -User Kbuldogov@winitpro.onmicrosoft.com -Role Owner
To remove from a channel:
get-team -DisplayName sysops| Remove-TeamChannelUser -DisplayName “Windows_Wiki” -User Kbuldogov@winitpro.onmicrosoft.com -Role Owner
If a Teams team is not active, but you want to make its content available for users to read, you can archive it:
get-team -DisplayName sysops|Set-TeamArchivedState -Archived $true
Delete channel:
get-team -DisplayName sysops | Remove-TeamChannel -DisplayName “Windows_Wiki”
Completely remove a Teams team:
get-team -DisplayName sysops | Remove-Team
Create a new Teams policy:
New-CsTeamsMessagingPolicy –Identity CsTeamsExternalUsersPolicy -AllowGiphy $false -AllowMemes $false –AllowUserChat $false
Identity: Tag:CsTeamsExternalUsersPolicy
Description:
AllowUrlPreviews: True
AllowOwnerDeleteMessage: False
AllowUserEditMessage: True
AllowUserDeleteMessage: True
AllowUserDeleteChat: True
AllowUserChat: False
AllowRemoveUser: True
Allow Giphy: False
GiphyRatingType: Moderate
AllowGifiDisplay: True
AllowPasteInternetImage: True
AllowMemes: False
AllowImmersiveReader: True
AllowStickers: True
AllowUserTranslation: True
ReadReceiptsEnabledType: UserPreference
AllowPriorityMessages: True
AllowSmartReply: True
AllowSmartCompose: True
ChannelsInChatListEnabledType: DisabledUserOverride
AudioMessageEnabledType: ChatsAndChannels
ChatPermissionRole: Restricted
AllowFullChatPermissionUserToDeleteAnyMessage: False
AllowFluidCollaborate: False
AllowVideoMessages: True
Assign a Teams policy per user:
Grant-CsTeamsMessagingPolicy -Identity Kbuldogov@winitpro.onmicrosoft.com -PolicyName CsTeamsExternalUsersPolicy
Or to all users with a specific attribute in AzureAD:
Get-CsOnlineUser -Filter {Department -like '*External*'} | Grant-CsTeamsMessagingPolicy -PolicyName CsTeamsExternalUsersPolicy
After you end your PowerShell session, don't forget to disconnect from Microsoft Teams:
Disconnect-MicrosoftTeams


Комментарии